Reverse Parallel Park in South Australia
Reverse parallel parking is one of the five slow speed manoeuvres used in South Australian VORT preparation. It tests whether you can leave and enter a confined parallel parking bay safely, observe correctly, control the vehicle at low speed and finish in a suitable position near the kerb.
This guide explains the manoeuvre in plain English for learner drivers and overseas licence holders in Adelaide. It is a training guide only and does not replace official South Australian road rules or assessment instructions.
What Is Reverse Parallel Parking?
Reverse parallel parking is a low-speed manoeuvre where the vehicle is reversed into a parking space parallel to the kerb. In the South Australian driving test environment, the bay may be marked by poles rather than real parked cars.
Observe before and during reversing
Check right, left and behind over your shoulders before reversing, and keep checking while the vehicle is moving.
Keep full control
Use slow speed, accurate steering and controlled braking. The car should not touch the kerb or poles.
Finish in the correct position
The vehicle should finish parallel to the kerb, wheels straight, close enough to the kerb and central in the bay.
How the Test Bay Is Usually Set Up
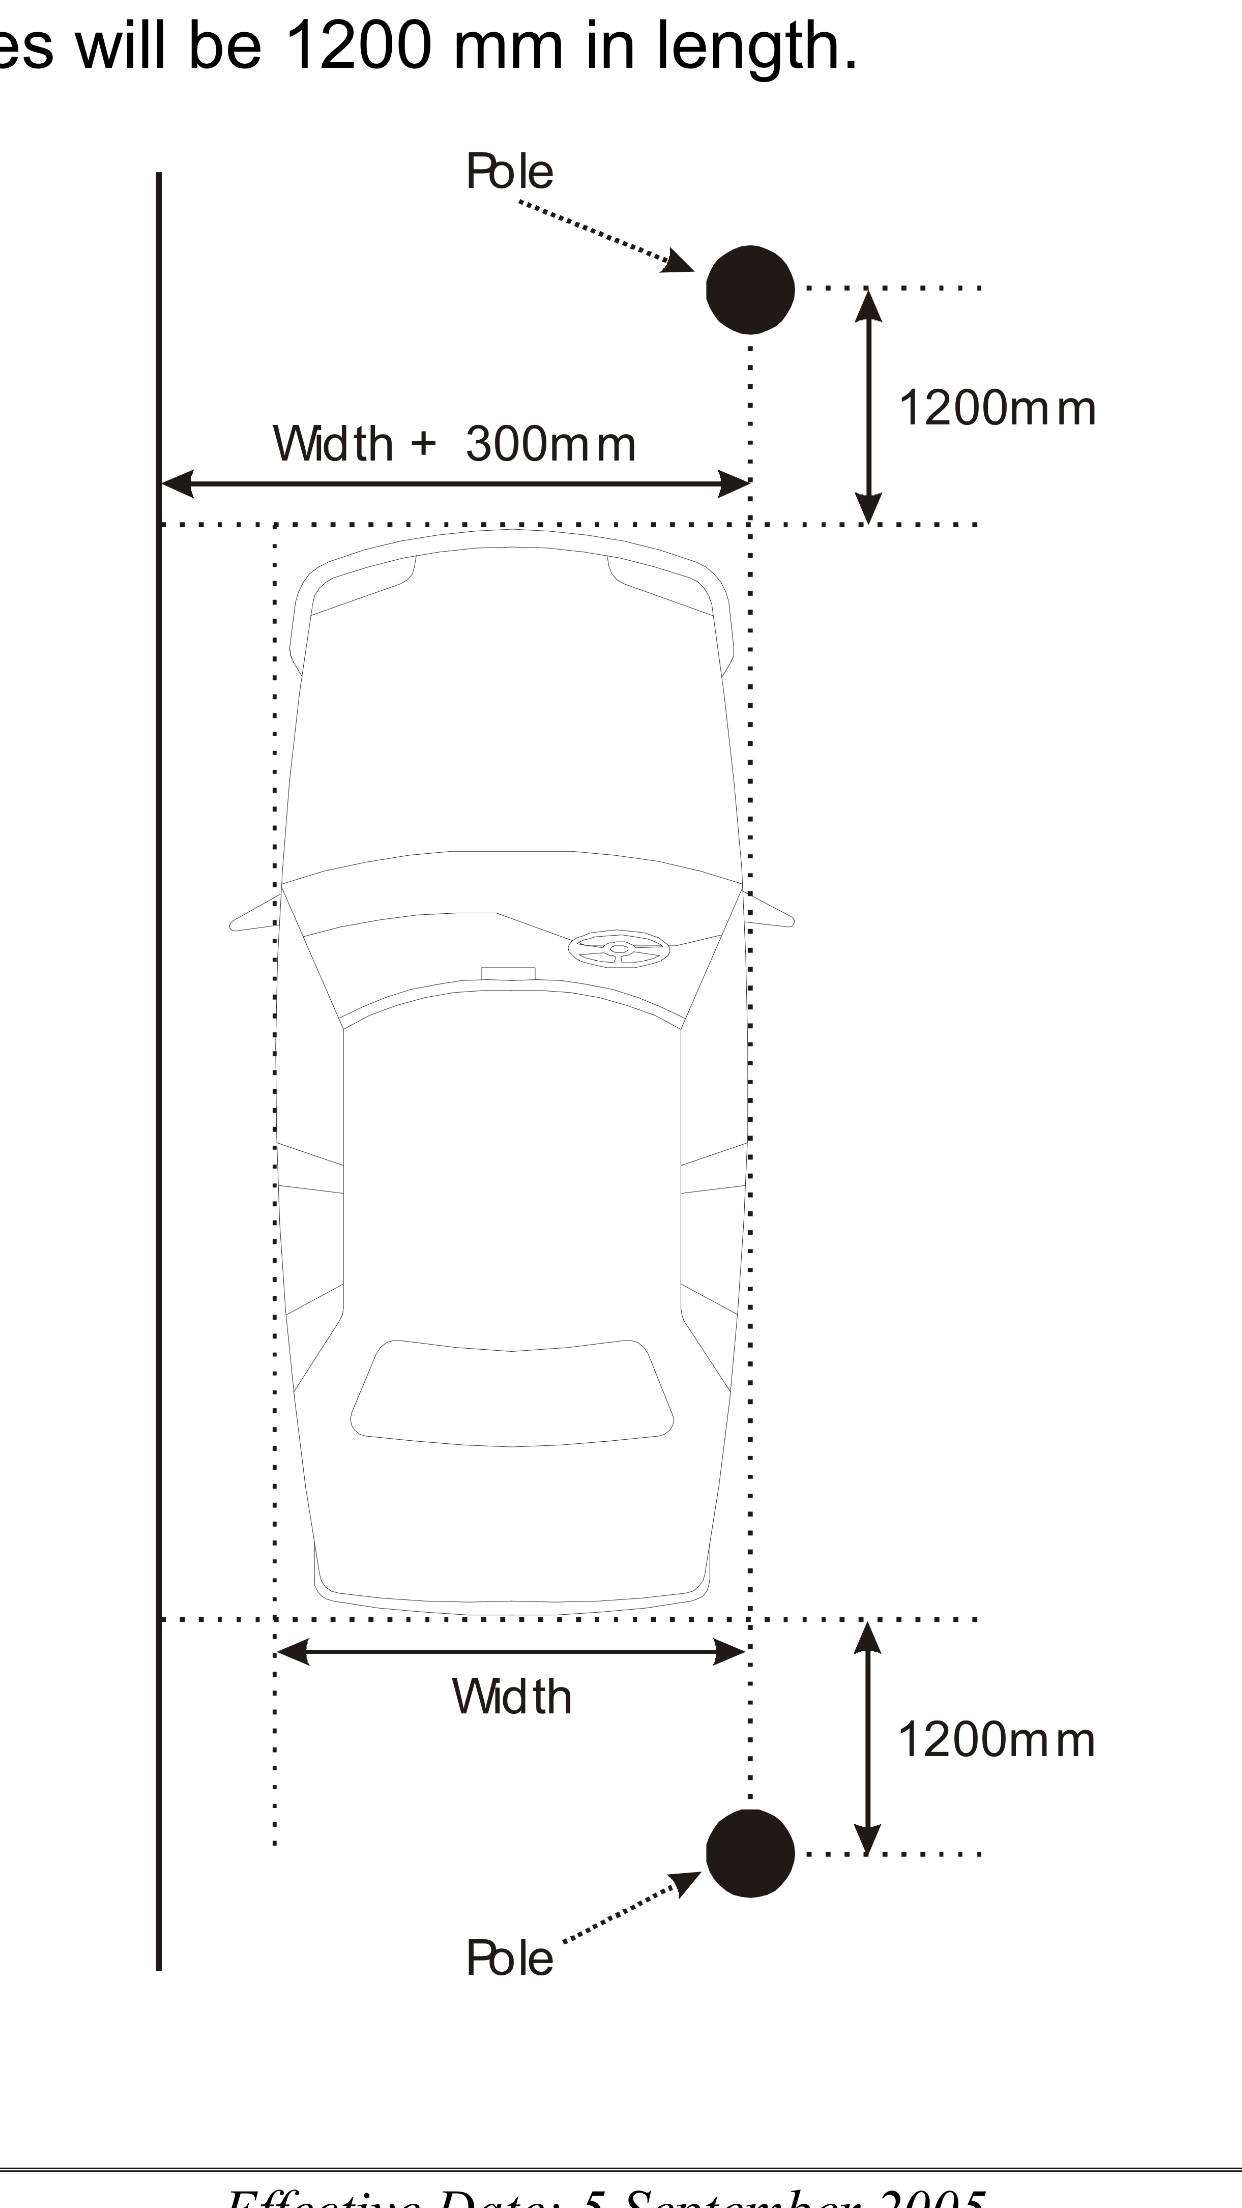
In many VORT-style training situations, the examiner or instructor will position poles to create a confined parallel parking bay. The exact setup can vary, but the aim is to check whether the driver can enter and leave a limited parking space safely and accurately.
Confined space
- The vehicle starts near the left kerb.
- The bay is usually marked by front and rear poles.
- The manoeuvre includes leaving the bay and reversing back into it.
- The vehicle must not touch any pole or the kerb.
Final position
- Left wheels should be within 300 mm of the kerb.
- Wheels should be straight.
- The vehicle should be central in the bay.
- Official MyLicence wording says not less than 900 mm to the nearest pole.
Part 1: Leaving the Parallel Parking Bay
The first part of the manoeuvre is leaving the confined bay safely and positioning the car parallel to the kerb before reversing back in.
Prepare and check mirrors
Before moving, check the centre mirror and right mirror. Prepare the vehicle to move off safely.
Signal right for at least 5 seconds
Signal right for a minimum of 5 seconds before moving away from the kerb. This is part of the moving-off safety system.
Final blind spot check
Check the right blind spot and confirm it is safe. Give way to vehicles, cyclists and any other road users.
Move out slowly
Steer right and leave the bay under control. Do not touch the poles and do not drive between the pole and the kerb.
Stop parallel to the kerb
Stop so that the rear of the vehicle is just past the parking bay’s front pole and the vehicle is parallel to the kerb.
Part 2: Reversing Back Into the Parking Bay
The second part is reversing into the bay. This is where many students become too focused on the steering and forget to keep observing.
Select reverse and observe
Select reverse. Before moving, check right, left and behind over your shoulders. Look for vehicles, cyclists, pedestrians and driveway traffic.
Reverse slowly toward the bay
Reverse under full control. Use your mirrors and head checks, but do not rely only on the reverse camera.
Check all around before steering left
Before turning the wheel left to enter the bay, check all around again. This is a key safety step, not just a parking technique.
Enter the bay slowly
Steer into the parking space at low speed. Keep observing behind and both sides while the vehicle is moving.
Straighten and centralise
After entering the bay, straighten the wheels and adjust if necessary. The official standard allows no more than two directional changes after entering the bay.
Finish safely
Finish with the vehicle parallel to the kerb, left wheels within 300 mm of the kerb, wheels straight, and the vehicle central in the bay.
Observation Pattern
Observation is one of the most important parts of reverse parallel parking. A student can have good steering but still fail the manoeuvre if they do not observe properly.
| Stage | What to check | Why it matters |
|---|---|---|
| Before leaving bay | Centre mirror, right mirror and right blind spot. | To make sure it is safe to move away from the kerb. |
| Before reversing | Right, left and behind over your shoulders. | To check for vehicles, cyclists, pedestrians and driveway traffic. |
| Before steering left | All around the vehicle. | To confirm no road user has entered your reversing path. |
| During reversing | Behind, both sides, mirrors and blind areas. | Traffic conditions can change while you are moving. |
| Before final adjustment | Kerb, poles, road users and vehicle position. | To finish safely without hitting the kerb or poles. |
Final Parking Position
The final position matters. You are not just trying to get the car somewhere near the kerb. The vehicle must finish safely and accurately inside the bay.
Close to kerb
The left wheels should be within 300 mm of the kerb.
Central in the bay
The vehicle should be centrally located and not too close to either pole.
Wheels straight
Finish with the vehicle parallel to the kerb and the wheels straight.
Common Mistakes in Reverse Parallel Parking
Forgetting the 5-second signal
When leaving the kerb, the right signal must be used correctly and early enough.
Weak blind spot checks
A quick mirror glance is not enough when moving from the kerb or reversing.
Reversing while staring forward
Students sometimes look only at the mirror, screen or steering wheel instead of checking around the car.
Hitting the kerb or poles
Poor speed control or late steering can cause the car to touch the kerb or a pole.
Too far from the kerb
The vehicle must finish close enough to the kerb, not just inside the general area.
Too many adjustments
After entering the bay, the official standard limits how many directional changes can be used to finish the exercise.
What Can Cause a “Not Yet Competent” Result?
In a test or assessment situation, reverse parallel parking may be marked as not yet competent if the driver does not complete the manoeuvre safely, legally and in control.
High-risk problems
- Moving off without correct mirror, signal and blind spot checks.
- Failing to give way when leaving the parking position.
- Touching the kerb or touching a pole.
- Driving between a pole and the kerb.
- Not checking right, left and behind before or during reversing.
- Finishing more than 300 mm from the kerb.
- Finishing too close to a pole or not central in the bay.
- Using too many directional changes after entering the bay.
- Losing full control of the vehicle.
Instructor Tips
Go slower than you think
Slow speed gives you time to steer, observe and stop before touching the kerb or pole.
Do not rely on one reference point
Reference points change between cars. Learn the safety system and understand the vehicle position.
Observe before steering
A common test problem is turning the steering wheel before checking all around.
Finish calmly
If adjustment is allowed and needed, use it calmly. Do not rush and make the final position worse.
How This Connects to VORT Preparation
Reverse parallel parking is not just a parking trick. It shows whether the driver can combine observation, signalling, judgement and low-speed vehicle control under test pressure.
Observation
Right, left and behind checks before and during reversing.
Judgement
Knowing when to wait, when to move and how to avoid affecting other road users.
Vehicle control
Slow speed, accurate steering, safe position and calm final adjustment.
To prepare properly, practise with a driving instructor first. Do not practise reverse parking in busy traffic or unsafe locations.
Other VORT Manoeuvre Guides
Reverse parallel parking is one of the five slow speed manoeuvres. You can also read the other manoeuvre guides when they are available.
Moving off from kerb
Angle park
Three-point turn
U-turn
All 5 manoeuvres
VORT overview
Official Reference
Use official sources for licensing and assessment information because requirements may change.